Overview
WMware Workstation Pro를 이용하여 우분투를 인스톨하였다.
하지만, Host PC인 Window10에서 사용 하던 파일을 VMware의 우분투로 파일로 사용하려니 매번 USB를 사용하는 것도 어려운 일이었다.
그래서 구글링을 하다 보니 파일 공유로 쉽게 이 문제를 해결할 수 있다는 것을 뒤늦게 발견했다.
그 방법은 다음과 같다.
Host PC에서 공유 폴더 설정
먼저 Host PC인 Window10에서 공유할 폴더를 하나 만들고 공유 설정을 진행하면 된다.
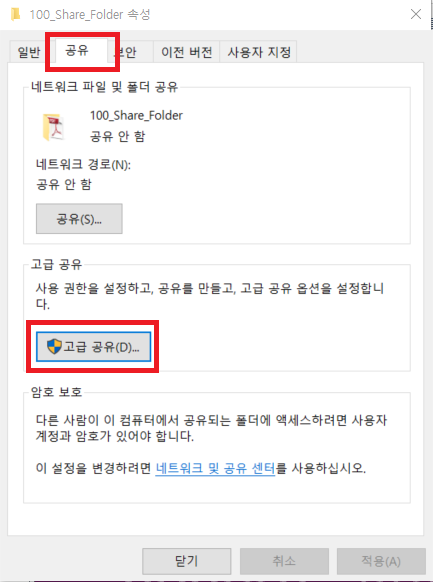
1. 공유할 폴더를 선택 후 오른쪽 클릭 그리고 속성으로 진입

3. 공유 탭으로 이동 후 고급 버튼을 클릭
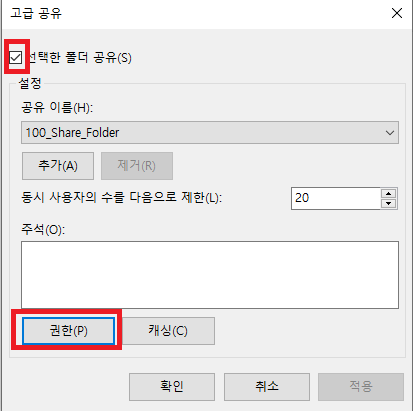
6. 선택한 폴더 공유 체크 박스를 체크 하고 권한 버튼을 클릭
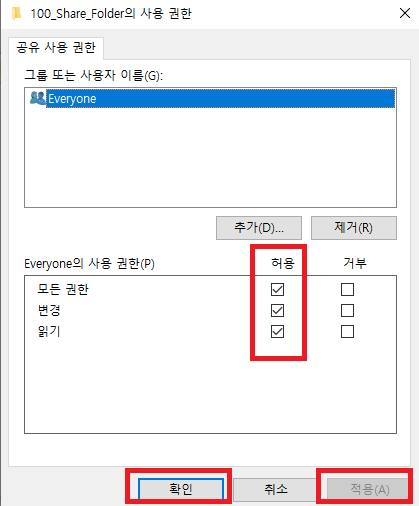
7. 사용권한을 모든권한 허용으로 체크 한 후 적용 버튼과 확인 버튼을 차례로 클릭한다.
VMware에서 공유폴더 설정
우분투 구동 전 설정
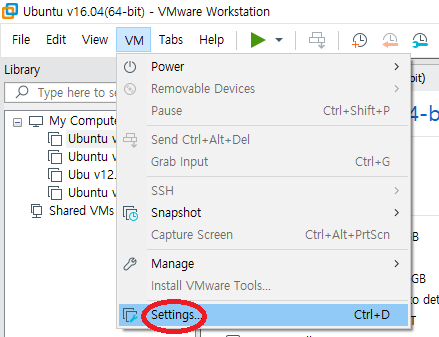
1. VMware에서 우분투를 구동하기 전에 메뉴바에서 VM을 선택하고, 그 다음 Settings를 선택한다.
2. Options 탭을 선택 후 Shared Folders를 선택 그리고 나서 Folder sharing을 Always enabled로 선택한다.
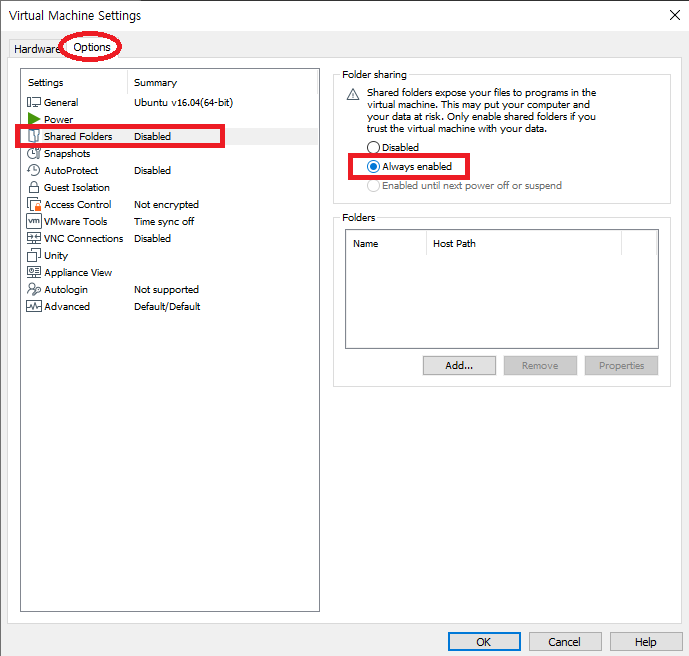
3. Floders에서 Add를 누르면 Add shared Folder Wizard가 뜬다. Wizard 창에서 Next를 누른다.


5. Host path에서 Browser를 눌러서 Host PC 공유 폴더 설정에서 작업한 폴더 경로를 여기서 동일하게 선택하면 된다. Name은 원하는 이름으로 설정하면 된다. 그리고 Next를 누른다.

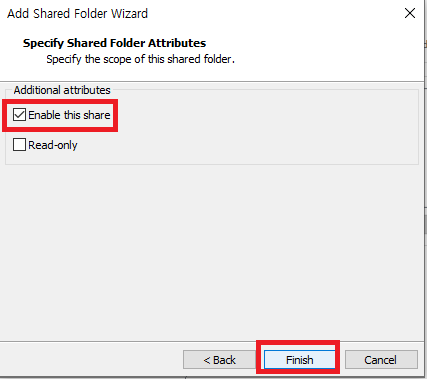
6. Enable this share의 체크박스에 체크를 하고 Finish 버튼을 눌러 종료 한다.
7. OK 버튼을 눌러 설정을 모두 마무리 한다.

우분투 구동 후 설정
1. 로그인 하기 전에, 우분투를 구동 시킨 탭에서 오른쪽 클릭 후 Reinstall VMware Tools를 선택한다.

2. 화면 하단에 로그인을 하고 virtual CD drive를 Mount하고 Terminal을 띄워서 tar로 압축 파일을 풀은 후 vmware-install.pl 파일을 실행하라는 문구가 화면 하단에 뜬다. 이것을 확인하고 로그인을 한다.

3. 로그인 후 파일 탐색기를 열면 CD drive에 VMware Tools가 Mount가 되어 있고, 그곳에 VMwareTools-10.3.10-13959562.tar.gz이 존재하는 것을 확인 할 수 있다. 바로 이 tar.gz 파일을 압축을 풀어야 한다.
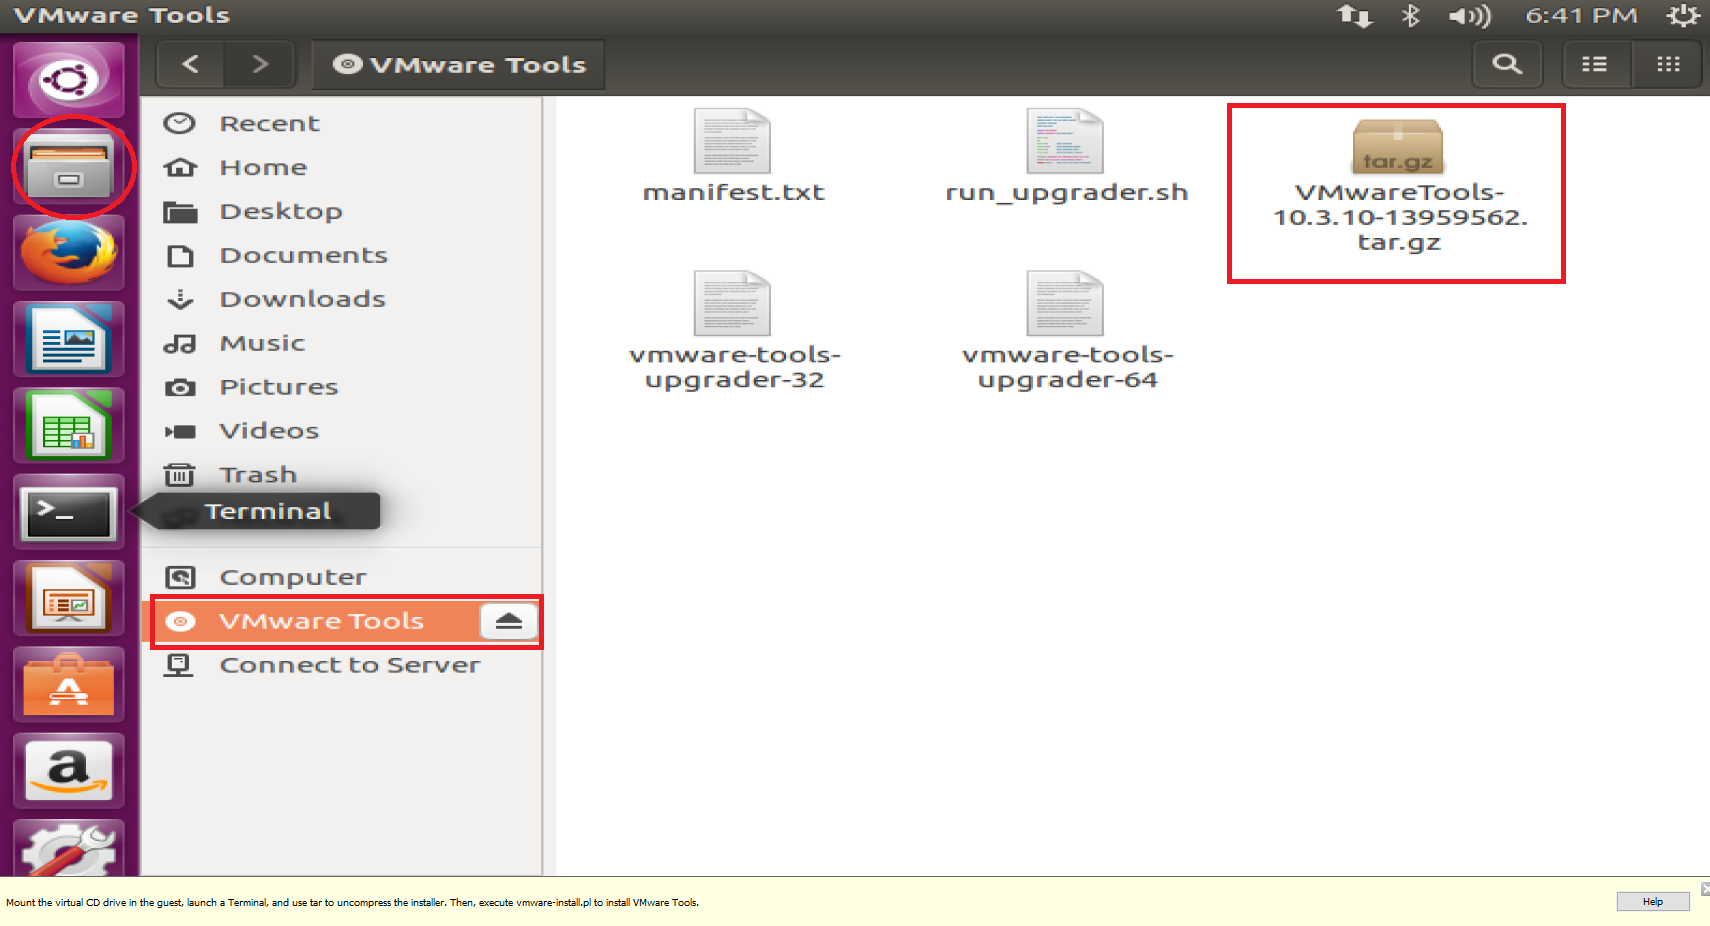
4. Terminal을 실행하여 다음과 같은 경로를 타고 tar.gz 파일이 있는 곳 까지 이동을 하여, 압축을 해제한다.
mskim@ubuntu:~$ cd ..
mskim@ubuntu:/home$ cd ..
mskim@ubuntu:/$ cd media
mskim@ubuntu:/media$ ls
floppy  floppy0  mskim
mskim@ubuntu:/media$ cd mskim
mskim@ubuntu:/media/mskim$ ls
VMware Tools
mskim@ubuntu:/media/mskim$ cd VMware\ Tools
mskim@ubuntu:/media/mskim/VMware Tools$ ls
manifest.txt     VMwareTools-10.3.10-13959562.tar.gz  vmware-tools-upgrader-64
run_upgrader.sh  vmware-tools-upgrader-32
mskim@ubuntu:/media/mskim/VMware Tools$ cp VMwareTools-10.3.10-13959562.tar.gz ~/.
mskim@ubuntu:/media/mskim/VMware Tools$ cd ~
mskim@ubuntu:~$ ls
Desktop
Documents
Downloads
examples.desktop
gcc-linaro-6.5.0-2018.12-x86_64_arm-linux-gnueabihf
gcc-linaro-6.5.0-2018.12-x86_64_arm-linux-gnueabihf.tar.xz
Music
Pictures
Public
Templates
u-boot
Videos
VMwareTools-10.3.10-13959562.tar.gz
mskim@ubuntu:~$ tar xzf VMwareTools-10.3.10-13959562.tar.gz
mskim@ubuntu:~$ ls
Desktop
Documents
Downloads
examples.desktop
gcc-linaro-6.5.0-2018.12-x86_64_arm-linux-gnueabihf
gcc-linaro-6.5.0-2018.12-x86_64_arm-linux-gnueabihf.tar.xz
Music
Pictures
Public
Templates
u-boot
Videos
VMwareTools-10.3.10-13959562.tar.gz
vmware-tools-distrib
mskim@ubuntu:~$ cd vmware-tools-distrib
mskim@ubuntu:~/vmware-tools-distrib$ ls
bin  caf  doc  etc  FILES  INSTALL  installer  lib  vgauth  vmware-install.pl
5. vmware-install.pl 파일을 위에서 제일 마지막에 확인 할 수 있었다. 이것을 쉘로 실행을 한다. 실행 후 중간 중간 Yes/No를 입력하거나 또는 경로를 입력을 해주어야 한다. 본인은 모두 Yes로 했던거 같고, 경로는 예제로 나와있는 경로와 동일하게 입력을 하였다.
mskim@ubuntu:~/vmware-tools-distrib$ sudo ./vmware-install.pl
The installer has detected an existing installation of open-vm-tools packages
on this system and will not attempt to remove and replace these user-space
applications. It is recommended to use the open-vm-tools packages provided by
the operating system. If you do not want to use the existing installation of
open-vm-tools packages and use VMware Tools, you must uninstall the
open-vm-tools packages and re-run this installer.
The packages that need to be removed are:
open-vm-tools
Packages must be removed with the --purge option.
The installer will next check if there are any missing kernel drivers. Type yes
if you want to do this, otherwise type no [yes] yes

INPUT: [yes]

Creating a new VMware Tools installer database using the tar4 format.

Installing VMware Tools.

In which directory do you want to install the binary files?
[/usr/bin] /usr/bin

INPUT: [/usr/bin]

What is the directory that contains the init directories (rc0.d/ to rc6.d/)?
[/etc] /etc

INPUT: [/etc]

What is the directory that contains the init scripts?
[/etc/init.d] /etc/init.d

INPUT: [/etc/init.d]

In which directory do you want to install the daemon files?
[/usr/sbin] /ure/sbin

INPUT: [/ure/sbin]

The path "/ure/sbin" does not exist currently. This program is going to create
it, including needed parent directories. Is this what you want? [yes] no

INPUT: [no]

In which directory do you want to install the daemon files?
[/usr/sbin] /usr/sbin

INPUT: [/usr/sbin]

In which directory do you want to install the library files?
[/usr/lib/vmware-tools] /usr/lib/vmware-tools

INPUT: [/usr/lib/vmware-tools]

The path "/usr/lib/vmware-tools" does not exist currently. This program is
going to create it, including needed parent directories. Is this what you want?
[yes] yes

INPUT: [yes]

In which directory do you want to install the documentation files?
[/usr/share/doc/vmware-tools] /usr/share/doc/vmware-tools

INPUT: [/usr/share/doc/vmware-tools]

The path "/usr/share/doc/vmware-tools" does not exist currently. This program
is going to create it, including needed parent directories. Is this what you
want? [yes] yes

INPUT: [yes]

The installation of VMware Tools 10.3.10 build-13959562 for Linux completed
successfully. You can decide to remove this software from your system at any
time by invoking the following command: "/usr/bin/vmware-uninstall-tools.pl".

Before running VMware Tools for the first time, you need to configure it by
invoking the following command: "/usr/bin/vmware-config-tools.pl". Do you want
this program to invoke the command for you now? [yes] yes

INPUT: [yes]


You have chosen to install VMware Tools on top of an open-vm-tools package.
You will now be given the option to replace some commands provided by
open-vm-tools.  Please note that if you replace any commands at this time and
later remove VMware Tools, it may be necessary to re-install the open-vm-tools.

The file /usr/bin/vmware-hgfsclient that this program was about to install
already exists.  Overwrite? [no] yes

INPUT: [yes]

The file /sbin/mount.vmhgfs that this program was about to install already
exists.  Overwrite? [no] yes

INPUT: [yes]

The file /usr/bin/vmhgfs-fuse that this program was about to install already
exists.  Overwrite? [no] yes

INPUT: [yes]

Initializing...


Making sure services for VMware Tools are stopped.

Stopping VMware Tools services in the virtual machine:
   VMware User Agent (vmware-user):                                    done
   Unmounting HGFS shares:                                             done
   Guest filesystem driver:                                            done


The module vmci has already been installed on this system by another installer
or package and will not be modified by this installer.

The module vsock has already been installed on this system by another installer
or package and will not be modified by this installer.

The module vmxnet3 has already been installed on this system by another
installer or package and will not be modified by this installer.

The module pvscsi has already been installed on this system by another
installer or package and will not be modified by this installer.

The module vmmemctl has already been installed on this system by another
installer or package and will not be modified by this installer.

The VMware Host-Guest Filesystem allows for shared folders between the host OS
and the guest OS in a Fusion or Workstation virtual environment.  Do you wish
to enable this feature? [yes] yes

INPUT: [yes]

The vmxnet driver is no longer supported on kernels 3.3 and greater. Please
upgrade to a newer virtual NIC. (e.g., vmxnet3 or e1000e)


Skipping configuring automatic kernel modules as no drivers were installed by
this installer.


Skipping rebuilding initrd boot image for kernel as no drivers to be included
in boot image were installed by this installer.

The configuration of VMware Tools 10.3.10 build-13959562 for Linux for this
running kernel completed successfully.

Enjoy,

--the VMware team

mskim@ubuntu:~/vmware-tools-distrib$
이제 모든 설정은 완료가 되었다.
Host PC인 Win10에서 공유 폴더 확인 하기
공유 폴더는 처음에 "Host PC에서 공유 폴더 설정" 부분에서 우리가 설정했던 공유 폴더가 되겠다.
VMware의 우분투에서 공유 폴더 확인 하기
공유 폴더는 다음과 같이 "Computer → mnt → hgfs" 안에 우리가 이전에 "VMware에서 공유펄더 설정" 항목에서 "우분투 구동 전 설정" 부분의 5번 항목에서 공유 폴더이름을 만들었던 그 이름 그대로 폴더가 존재하는 것을 알수 있다.

여기서 추가로, 이 경로까지 들어오기가 만만하지 않기 때문에 이 폴더를 Desktop 폴더로 복사하도록 하겠다.
mskim@ubuntu:/mnt/hgfs$ cp -r Sharefolder ~/Desktop그러면 바탕화면에 공유 폴더가 복사가 되어, 공유 폴더를 접근하기도 훨씬 용이해 진다.
- 끝
'안드로이드 임베디드 > 공통주제' 카테고리의 다른 글
| SourceTree가 갑자기 안될때 (0) | 2023.06.21 |
|---|---|
| Ubuntu에 Qt 프로그램 Install 하기 (0) | 2021.03.12 |
| HAL 개발 작업 순서 (0) | 2019.12.17 |
| Android Kernel Vs Linux Kernel (0) | 2019.12.17 |
| Android Studio 3.5.2에서 Java compile error 회피 (2) | 2019.12.04 |